Feeds:
Posts
Comments

Zurich and Sweet Zurich

My biggest struggle is to make time last and stretch out indefinitely. Well,  not índefinitely’ in the literal sense. It never seems enough to do all things on my list after I leave work. In days like today this battle seems to have the upper hand. The other day I got home at 8.30 and quickly concocted a light supper together. I was ravenous but too tired to cook anything that could be laborious. I just sliced thin strips of roast beef and threw into a salad bowl with radicchio leaves, some red chillie and a dressing that was much closer to Thailand than Surrey. Was it pure hunger that made me classify that meal as a total delight? Could as well have been. The result was total satisfaction.

Amidst this big struggle with time I jumped at the opportunity of heading to Zurich for a couple of days. It was the opportunity to get away,have a change of environment, get to know a new place and talk and eat a lot of chocolate that made the short trip seem even more unmissable.

I left a snow covered Surrey to arrive in a magically white dressed Zurich. I spent so many springs in Switzerland in the past. Always rowing. I used to combine those visits with visits to Basel or Berne where a very good friend lived.  For no particular reason Zurich was always a passing by city. I encountered an absolutely pretty place, full of narrow cobbled streets, charming shops, very polite locals, beautiful buildings. Suddenly I just felt totally enamoured with this city that never before seemed to deserve a lot of my time.

There was also Sprungli, the famous Confisserie. And then there was Sweet Zurich, the tours organized by the author of My Kughelhopf. They are tours involving a very small number of people, so to keep it intimate.  The four of us – three participants and Kerrin who is the brain and organizer of the tours, met outside Sprungli flagship shop at Paradeplatz. There was a warm and friendly introduction, where we all took in turns to tell a wee bit about ourselves. That just broke the ice nicely, and set a friendly tone to the few hours we had together. We were introduced to some lovely shops – from chocolate to cupcakes. They were all little gems, small businesses with an awful lot of character. Friendly shop owners and staff. We all had plenty of time to take it all in. The new flavours, the surroundings, the history behind the place…I  won’t tell you the places we visited  as that should be the surprise element of Sweet Zurich. I do recommend the trip immensely. Kerrin is a delightful girl, extremely charismatic who makes us feel terribly comfortable.  Very knowledgeable of all things chocolate. I have no doubt that anyone who takes the trip will have a great time. Get in touch with her: SWEET ZURICH.

The day after the tour I went back to a couple of the shops we visited and purchased some chocolate to take home. It has been nearly a month and I still have quite a few delicious specimen saved for a special occasion.

It was a short trip but such joy. I’m really glad I took it.

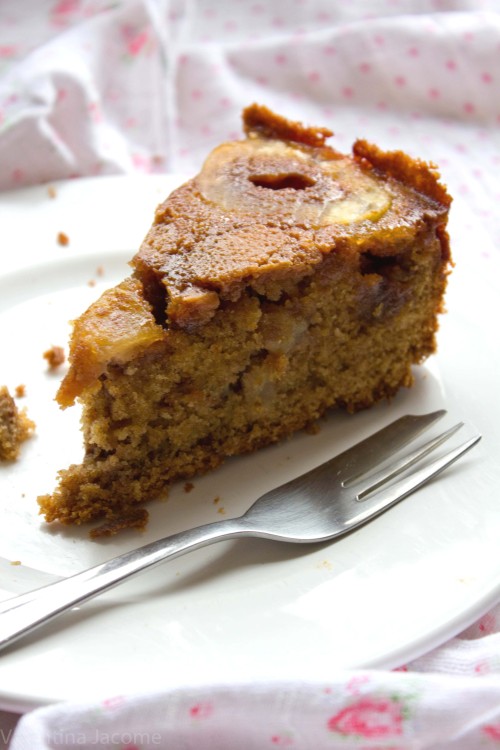
Apple and Fudge cake

Apples and fudge. All in a cake. It sounds like something that kids would put together. I had read somewhere that apple and caramel are a god combination. So fudge didn’t sound too far off.  You see, I love baked apples, apple juice, apple yoghurt, apple pureé. Not too excited by the fruit in its natural form. Nonetheless  I do buy apples galore when in season, and go overboard making yummy things with it. This cake fits perfectly in the yummy and fun apple baked goods shelf.

I came across this recipe when at home on a Sunday with the BBC show Something for the Weekend playing in the background. For the ones who don’t know it’s a Sunday TV show which mixes interviews with cooking. There I was with my back turned to the screen and I heard the words ‘apple and fudge’. I Put a stop on lunch prep work and focused fully on watching the steps to apple cake heaven.

The recipe is really quick to put together. The most laborious tasks being peeling, coring, slicing and chopping the apples. Plus chopping the fudge. The cake will sit in the oven for nearly an hour which allows you to get on with things. You can even have a shower and wash your hair. This beautiful chemistry of ingredients  fills the kitchen with the most seasonal and alluring smell, that of apples and cinnamon. 


A couple of weeks after making the cake for the first time I found myself in the shop of Wiseley Gardens not far from where I live. Prior to visiting the shop I had been  on a nice stroll on the grounds, and the chilly autumn walk had filled me with cake and tea desire. In the shop I saw soft fudge on sale, and immediately decided to bake the apple cake again. That soft fudge was going to be just perfect. And so it was.


It’s a ‘grown up’ cake. Doesn’t need hand holding, or pretty icing. It stands out on it’s own merit, and rewards you when you take a bite. Gentle crust on the sides, sticky on the finger. Juicy  on top where the apple rings sit, and sort of spongy in the middle. Brew a cup of tea to have with it, and have a taste of autumn with specs of fudge in the palate.

For the recipe go to this link – Something for the weekend. Just want to mention that I used three small apples, each weighing 100g each. Once peeled they weigh about 85 . I cut 1 1/2 apples in rings, and the remaining was chopped. I strongly believe that there might have been a typo on the apple weight in original recipe. The cake also served more than 6 people – I guess it will depend on the size of the slices.


From Plate to Page. A creation of four great minds and skills. A three day workshop where writing, talking, styling and photographing is centred on food. In the end you get much more than that. There is great location, new faces to meet, the chance to style and photograph with like minded people and fabulous props, to name but a few of what goes on. We tucked ourselves away at Il Salicone, a gem of a villa in Pistoia. Somewhere in Tuscany.

When I think about our  instructors all that comes up to my mind is humour as they had plenty, encouragement, positivity, generosity and honesty in their feedbacks. Four very approachable lassies who made themselves available to each and everyone of us at all times. We became partners in that weekend journey which was a starting point in a long term trip.  They are – in no special order:

The twelve women (there were no male attendants in this one event), were all very unique, noisy , loud and funny.  Above all they were very honest and open. The masks that one has sometimes to wear throughout life were put down. The exercises and activities asked that we bared our ‘words’ and ‘shots’ so that both could be deconstructed, evaluated, worked on and re-shaped. For the sessions on writing  I felt that it did not matter what one native language was– we had quite a spectrum between us. The sessions were extremely important as they touched the way one expresses oneself in words. The photo & styling sessions allowed us all to practice and learn not only from the instructors but from each other. I had my greatest ‘enlightment’ moment with the help of Kate.

The meals were surrounded by a lot of activity in the kitchen in and around the pans. People moving around with their cameras, others helping out with the washing up, chopping, tidying up…or even just chatting. The sitting down around the table was informative, relaxed, funny and delicious. Ok, it is very likely that the prosecco  bottles given by one of our sponsors and drank during meals also relaxed us all and introduced a lot of joy to those sessions. I miss the crowd and the lovely atmosphere when I’m in my tiny kitchen cooking by myself.

There was a bit of panic on my side as we were informed of the goodie bag awaiting for us. You see, I had not a small but pretty packed travel bag and could not for the life of me imagine trying to fit anything else in. The sponsors were truly generous and as much as the heavy Taste of Home binder weigh a bit on my arm as I walked around Florence killing time on my last day, I’m glad I brought it all the way back to Guildford. The other great goodies were beautiful and smartly packaged items by Smaromi – my favourite so far being the beautiful Tasmanian salt; the stunning looking pink Himalayan salt tile by Gourmelli; Oxo granted each one of us with one of their products ( mine was a silicone pastry brush); Sunchowder’s Emporia gave us an array of jam and mine is courgette and ginger (I promise you it is delicious and so far I’ve tried it with cheese;) a kitchen knife by the .gemini branded company ZWILLING J.A. HENCKELS (there can never be too many knifes in a cooks kitchen;) mild peppers by Peppadew International (I’ve been playing with the spicy little things and so far  Hayley’s recommendation of the ricotta filled peppers  has been the winning recipe); my return home dinner was with Riso Gallo’s memento; some matcha for my baking from Match Factory; a travel size bottle of Tabasco by no other than Tabasco and some needed vanilla extract by the family owned company Nielsen-Massey Vanillas. I have already mentioned the prosecco by Bisol, haven’t I?!

It is now slightly over a week since I returned and I have the fondest memories of a great weekend where I made new friends. Since then I  have read some lovely blog posts written by the people who took part in the weekend. I have also cooked some good recipes which are Il Salicone related. I toast to a wonderfully put together and ran event and the best thing I have done in 2011. Do check out other posts about the Plate 2 Page in Tuscany as well as the P2P webpage.

Related posts:

hazelnut flan

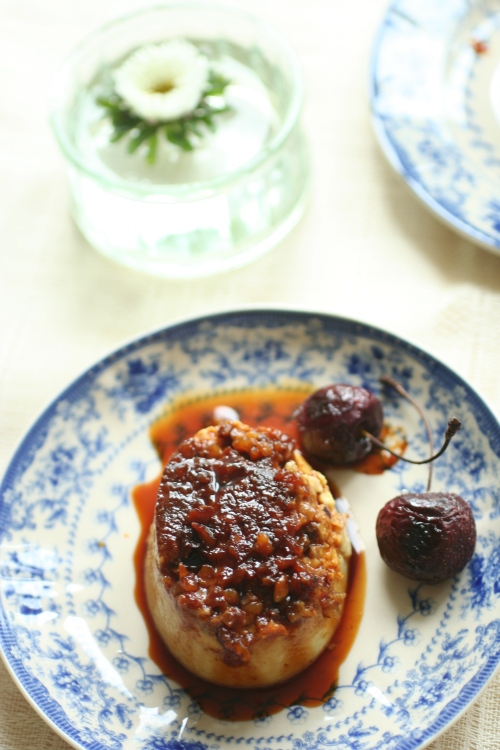
Flan. Back home in Brazil there’s a very popular dessert which is a flan. Condensed milk flan. To eat it brings back loads of memories. Coming to think of it perhaps the flans I had growing up were all of the same kind. I never even thought of even trying a different one. To me that was the ‘flan’, the one and only. The attraction was first of all the caramel sauce. That beautiful, dark ‘juice’ cascading down the lovely, creamy, cold creation. A marriage made in haven. One day reading one of my favourite blogs – Gastroanthropology, I read a post where Adrienne mentioned this hazelnut flan, served with some lovely roasted strawberries.
I made a mental note of the flan, but at the time got more interested in the strawberries recipe which ended up becoming the big summer discovery at home. I made it so many times and talked about it so often that I bet people wanted me to shut up in the end. The flan got to the very back of my mind until one day reading The Big Sur Bakery cookbook I came across the flan Adrienne had talked about . This time my attention was fully on this recipe. I then marvelled at the idea of marrying two of my passion: hazelnut and flan.
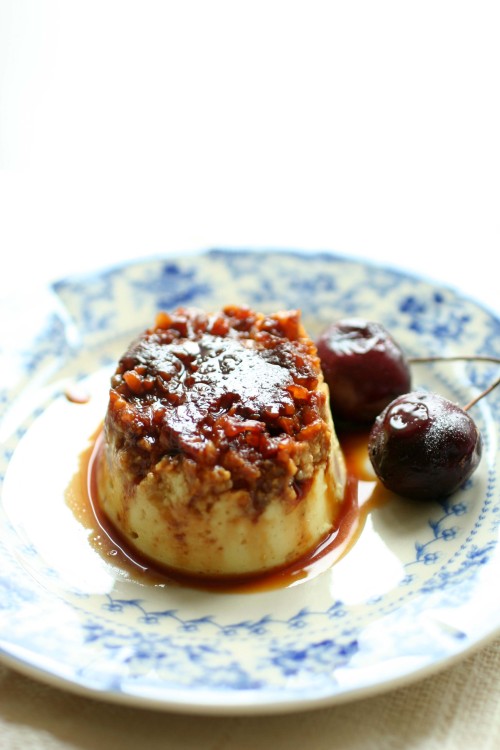
I was excited as a child at a toy store the day I set to prepare the recipe. I was going to make this little delight. And I wanted to use little moulds, individual portions. Each serving would have it’s own delicious caramel drizzle. Apart from the fact that some of my caramel didn’t come out out the mould as generously as I wanted, all went well. The hazelnut flavour was very present, to my total delight even though I had my doubts at some point.
As the day got darker and a wee bit cooler I could still relieve my summer days through this recipe. Big thanks to Adrienne for taking part in this great discovery.

This recipe was made in the summer for the first time, and I just made it for the fourth time. Every spoonful still brings me all the pleasure of that first time.

From The Big Sur Bakery Cookbook and inspired by Adrienne

Ingredients:

To prepare the custard:

  • 1 cup hazelnuts
  • 2 cups whole milk
  • 2 cups heavy cream
  • ¾ cup sugar
  • ½ ground Maldon salt
  • 3 whole eggs
  • 5 egg yolks

For the caramel:

  • ¾ cup sugar

8 ramekins or small flan dishes

Preparation:

The first step in the preparation of this recipe is the caramel. Caramel is to me the backbone of a good flan. The pure creaminess is embraced by this sweet juice.

Take a saucepan, a small one will do, and put the sugar and water in it . Cover the pan and bring it to a boil on high heat. Cook it for approximately 5 minutes, after which the lid should be removed, and it should be cooked for another 5 minutes – the sugar will take a much darker colour – and I really mean dark here. Divide the caramel among the eight selected containers, ensuring that it coveres the bottom of each container equally. That can be achieved by simply swirling the containers.

Pre-heat the oven to 150oC.- 130oC if you have a fan assisted oven.

Toast the hazelnuts on a dry frying pan. Remove from the heat once the hazelnut smell starts to come off. Let them cool and only then chop the hazelnuts.

To start preparing the actual custard, the first step is to start mixing the milk, cream, ½ of the sugar amount, the ground salt and the chopped hazelnut in a saucepan over medium/high heat. Once the mixture boils remove it from the heat and set it aside for about 30 minutes. The hazelnut flavour will penetrate the mixture.

As the milk mixture cools, whisk the eggs, the yolks and the remaining sugar in a bowl. Mix it vigorously. Set aside and bring the cooled milk mixture back to a boil As soon as it approaches the boiling point remove it from the heat. Then start pouring the  mixture gradually into the egg mixture, mixing it non stop. Put the mixture through a sieve to separate the hazelnuts from the rest. Pour the mixture back into a saucepan and cook over low heat till the desired consistency is achieved. The test is the coating of the back of the spoon. When it is achieved remove the custard from the heat.

Take a roasting pan and put the ramekins/flan dishes on it. I divided the hazelnuts on top of the caramel as I did not want to waste them. Divide the custard mixture equally amongst the containers. Pour boiling water on the roasting tin till halfway up the sides of the chosen containers. Before taking the tin to the oven cover it loosely with foil. Bake for approximately 30 minutes – the flan should be set by then.  Remove the tin from the oven and start plating the flans.

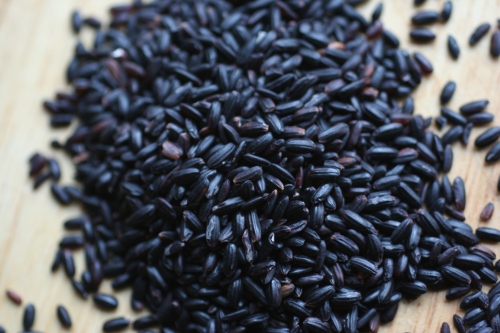
I guess that now my holidays are finally over. The holiday did not end when I arrived back. It took me a while to settle back, get into my old patterns. The fact that I also had a trip planned to Lisbon not long after my arrival made me feel still in holiday mood. I now have no more excuses. When I was in Lisbon I had a delicious rice pudding made by the lovely Isabel. It was so deliciously creamy, and had citrus notes to it. On my return I was given a Peter Gordon book by a good friend. It’s entitled ‘Cook at home with Peter Gordon’. In the Breakfast chapter there is this lovely black rice pudding recipe, something that the author ate in Indonesia. I confess that the first thing that really attracted me to it was the memory of the lovely rice pudding I had eaten in Lisbon, then the unusual rice – Chinese black rice, and the bananas. I got the rice from an Asian store in the town I live. Please note that this rice is different to the Thai glutinous black rice.

This dish is a success in so many levels. Visually it brings a lovely surprise as black rice is not something that one will expect to be served in the form of rice pudding. Then the addition of the coconut milk works so perfectly with the sweet mixture. I did add a touch more than 40ml but not too much more – otherwise the coconut milk will overpower the pudding flavour. Finally the palm sugar adds a lovely sweet touch at the end. I so enjoyed this dish. I wish my friend Isabel could have tried it.

Ingredients:

  • 400g black rice
  • 900ml water
  • 3 ripe bananas
  • 150g demerara sugar
  • Pinch of salt
  • 40ml coconut milk, and a bit more
  • 150g palm sugar

Preparation:

Put the rice in a colander and rinse it in cold water. Wash it until the water runs clear – just as you would do with normal ordinary rice. Once the water is clear leave the rice in the colander until it dries a bit. Then transfer the rice to a pan and cover it with the 900ml of water, bringing it to the boil uncovered, in medium heat. Once it boils, turn the heat down, cover the pan and let it cook slowly for about half an hour. Taste the rice – it should be not too soft, still holding a bite. If required let it cook a bit longer. Peel and chop the banana and add it to the rice, together with the demerara sugar once the rice gets to the not-too-soft-still-a-bit-of-a-bite stage. Cook for a few more minutes – you might need to add a bit of boiling water. Once the rice is done – it should be mushy, take the pan of the heat, giving it a good stir. Leave it to cool. It is now time to prepare the coconut milk: put the milk in a little jug, add the pinch of salt and mix it until the salt is dissolved. I tend to use a bit more than the 40ml but as I never measured it I cannot precise the quantity. When it comes to serving it, divide the rice amongst the bowls/glasses, pour equal amounts of the coconut milk on each of the containers. Grate the palm sugar and sprinkle it over the containers. All that is left is for you to enjoy it.

International holiday cookie recipe exchange

I was thrilled when I received this recipe from Lori. One of the main things was the main ingredient – cashew. I just love cashew. Like the fruit itself and the nut – well, in reality the fruit is the nut. My home state back in Brazil is a big cashew producer. I remember many holidays when driving down to the beach we would spot people roasting cashew on the road side. I guess it is one of those things that touches the deepest of my core. Goes all the way back to my routes and what makes me tick.

I also loved Lori’s email and how she talked a little bit about the time she lived in Brazil. There are things that make you warm up to a person. Lori also came across as this very interesting person, very active, a passionate traveller and cook.

I did the recipe as exactly as received by Lori with the only exception being that to decorate I only had roasted cashews at home. According to the original recipe it was not required. It is a lovely cookie, not too sweet, just well balanced. Plus the addition of the chocolate is a lovely touch – chocolate goes very well with nuts. If you click on the title of the recipe it should take you into the post that Lori wrote.


received from Lori from the great blog Fake food free
  • 1 cup unsalted butter, softened
  • ½ demerara sugar
  • 2 cup white whole wheat flour
  • 2 tbsp cocoa powder
  • 1 tsp vanilla
  • ½ cup raw cashews, finely chopped
  • 24 to 30 raw cashew halves (optional)
Prep:
  • In a mixer, combine the butter and sugar. Let it mix on medium and then high for about 3 minutes. The demerara takes a while to get incorporated. Mix in the flour, cocoa powder and vanilla.
  • On a piece of plastic wrap, spread out the chopped cashews. Remove the cookie dough from the mixing bowl and form it into a log with your hands. The length is up to you and depends on how big you want your cookies. Mine ended up being about 18 inches long, give or take a bit.
  • Place the cookie dough log on the plastic wrap and gently roll in the cashews until it is fully coated in nuts. Wrap the plastic wrap around the cookie dough and refrigerate for at least 30 minutes.
  • Preheat the oven to 350 degrees F. Remove the cookie dough from the fridge and use a serrated knife to cut the cookies about a ½ inch in thickness. Place on an ungreased cookie sheet, or on a baking mat on a cookie sheet. Press a cashew half into the top of each cookie if using.
  • Bake for 12 minutes or just until cookies are firm. The edges and cashews will brown only slightly, if at all. Allow to rest for 3 or 4 minutes and carefully move to a cooling rack. Makes about 24 to 30 cookies.

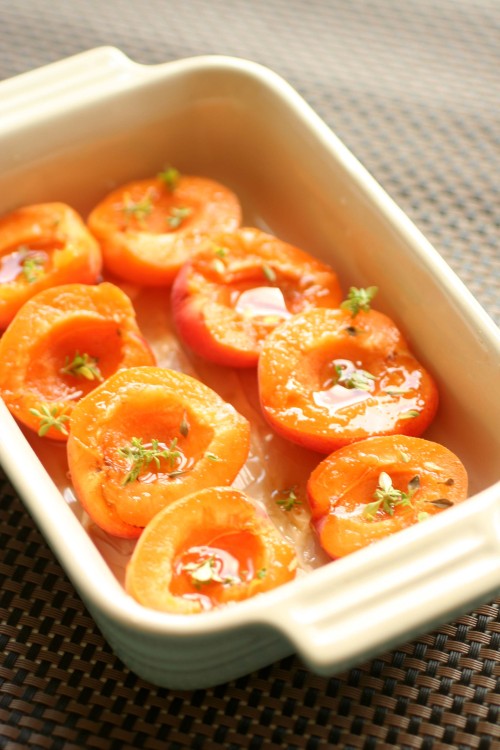
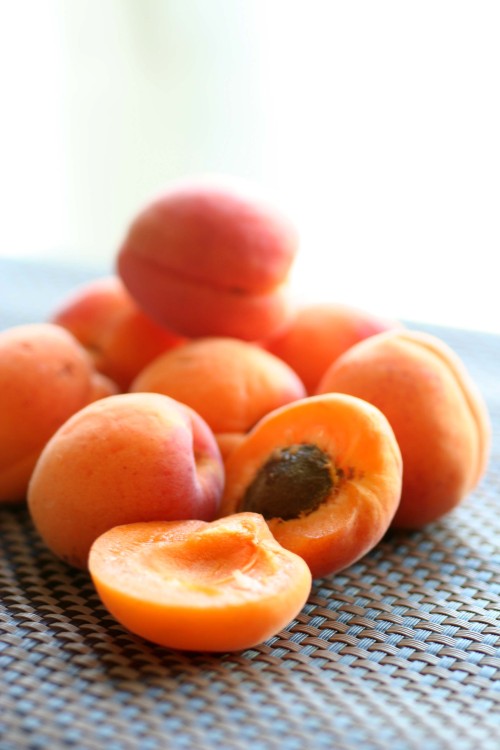
I have a terrible weakness – summer fruit. Often I bite more than I can chew and end up with one too many apricots, plums, strawberries. Whatever is in season. I then have to become quite creative in order not to waste anything. The other day I ended up buying quite a few apricots. After eating a fair amount I looked for a recipe for baked ones as I had never baked apricots before so I had no idea how to go on about it. I was very happy with the result of the recipe I picked – juicy and soft apricots, slightly roasted, not too sweet, and with a gentle touch of lemon thyme. I felt so grown up with this recipe. Great to have with yoghurt, or even with ice cream. If you are someone who likes quite sweet treats, I recommend that you do no add more sugar to these baked apricots. Instead add some honey when you are serving them.

This afternoon I really felt like having some more of the roasted apricots, but I didn’t feel like having any youghurt so  after pondering a bit I decided to bake an almond cake to go with it. I didn’t want anything very big, just a small and somehow simple cake. However, I didn’t want friands, as much as I love them. Instead I chose to bake a recipe which I have at hand for an emergency – not that this was one, which is by Darina Allen. It’s a wonderful little cake which is a bit like a white canvas, and I decided to pair it with some of the beautiful apricots. I made some fresh coffee, and had a most delicious treat. Funny enough the ingredients are pretty much like that of a friand except that we use egg yolks and not egg whites.

Ingredients:

  • 115g almond flour
  • 115g icing sugar, sifted
  • 85g flour, sifted
  • 125g unsalted butter, melted and cooled
  • 3 egg yolks,  lightly beaten

18cm sandwich tin – greased and floured

Pre-heat the oven – 180oC (160oC fan assisted).

How to:

Put both flours and icing sugar in a bowl and use a fouet to air it. Make a well in the centre pour the melted butter and egg yolks. Mix it all using the fouet. Spread the mixture over the base of the sandwich tin and bake for approximately 20 minutes. Before you remove it do the tooth pick test.

Baked Apricots

Ingredients:

  • 8 ripe apricots, stoned and halved
  • 1 ½ tablespoon sweet desert wine
  • 1 ½ tablespoon soft brown sugar
  • Few sprigs of lemon thyme leaves
  • 2 tablespoons demerara sugar

Pre-heat oven – 180oC  (160oC fan assisted).

How to:

Take an oven proof dish and brush it with a bit of melted butter. Place the apricots with the cut side facing up. Drizzle the dessert wine over them. Add a bit more if required. Sprinkle the brown sugar on top of the apricot, and then the thyme leaves.

Roast for 15 minutes, and then sprinkle it with the demerara sugar. Cook for a further 10 minutes. Let it cool before serving.

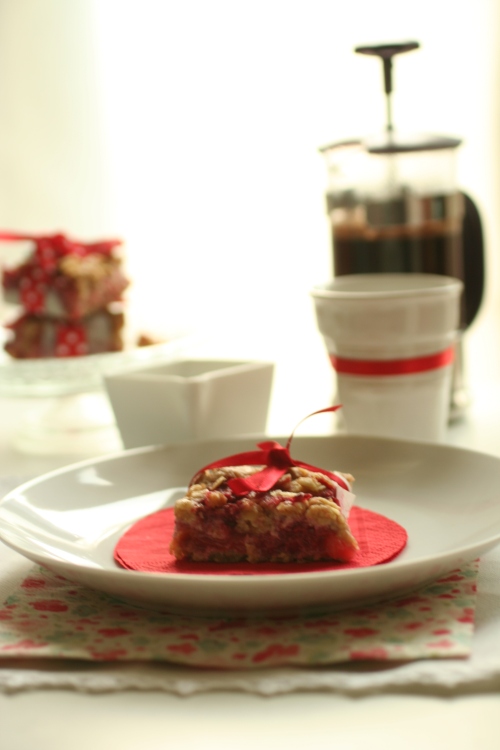
I have a bit of a crush on slices. I guess it could be because they make me feel as if I am not eating too much. You know how compact they are – as opposed to a fluffy slice of sponge cake for instance. Don’t take me wrong, I do like sponge cake – an awful lot. Having said that, sometimes we can embark on a guilt trip when eating one slice of sponge cake too many. When that reasonably big slice stares back at you, you might feel a bit of a glutton sometimes. Now, if we hold a little slice in our hands, to start with they are not big, so the guilt is reduced. Fair enough, after 5 pieces of a given slice I might end up feeling rather guilty anyway

In this spirit I welcomed the idea of a plum and raspberry slice. Firstly because I love baked fruits – very few are not up to the challenge. Then the idea of oats and fruit in a nice, compact slice could only be welcomed. It would be the combination of summer and a semi-healthy sweet treat. It’s the season for plums and I chose lovely British plumbs that were being sold locally. Being a big plum fan I tend to overbuy them and end up having to come up with creative ideas. The British plums are small and firm. I always look forward to them with great anticipation. Then, the idea of the raspberries. Raspberries are such fantastic berries. They are dead pretty, and full of flavour. Well, most of them anyway – I have come across a few in my lifetime which tarnish the good reputation of raspberries . The combination of flavours was perfect.

I got the recipe from J., a colleague at work.  She told me that herself and her partner were just hooked up on the slices. When I then asked for the recipe she was more than willing to share it, and I did buy the fruit on the same day. I ended up not baking it on the same day as I fell asleep before getting ready for the baking session. I then tried it the day after, in the morning. Preparing it was very simple, very few steps. The most laborious thing was the slicing of the plums. I used jumbo oats as I often buy them for my porridge. I could barely wait till the slice cooled down before I had a bit. The fruit was still piping hot and I was already half way into burning my tongue. OMG, this is a fabulous slice. Very moist in a way with all that fruit packed in. J. did not exaggerate a single bit. I’m often quite restrained when eating the baked goods I make – even though it might not look like it, but I just could not stop eating the slices. You can have yours with some yougurt on the side, or cream fraiche, or even ice cream. I never got that far. I shared some with neighbours so that I did not feel too guilty and terribly greedy, but I still kept a few more for additional indulgence.

Ingredients:

  • 150g porridge oats
  • 275g wholemeal flour
  • 1 teaspoon salt
  • 110g light brown sugar
  • 225g butter
  • 250g plums
  • 200g raspberries
  • 1 heaped teaspoon cinnamon

Baking tray – 25.5 x 15 cm. Buttered and lined with parchment paper

Preparation:

Pre-heat the oven – 200oC.

Cut the plums in  slices: start by cutting them in half, removing the stone. Finally cut them in thin slices and put in a bowl. Sprinkle the cinnamon on top and use your hands to mix it all. Add the raspberries to the bowl and with a spatula mix it with the plums. Put the flour, oats and salt in a bowl and set aside. Melt the butter and sugar in a saucepan over medium heat. Stir every so often until the butter and sugar are fully melted. Transfer the mixture to the bowl with the flour and oats and give it all a mix – use a wooden spoon first and then your hands. Take half the mixture and spread it evenly over the base of the tin. Be patient. It will work out. Then spread the fruit over the base. Finalize by spreading the mixture evenly over the top. Take the baking tray to the oven and bake for approximately 25-30 min. Remove it from the oven and let it cool before you start digging in – if you can help it. I dare you!

I do remember eating an awful lot of jelly growing up and once I was fully grown up. As a grown up it would be eaten mainly in times of diet. It was meant to be a cheat bite. I would have it when I was feeling too hungry but not wanting to spoil my main meal. I remember many barbecues back home when someone would bring a beautiful looking jelly dessert. It would look like a patchwork of jellies, all different colours and flavours. Don’t ask me what it was made of because I haven’t got the slightest idea. I believe that a lot of the appeal had to do with the beautiful visual – it did look stunning. As I write I actually ask myself whether my mom was ever a big jelly maker. And sadly enough I cannot remember at all. She probably wasn’t.

Well, you might be asking how come I confess not to being a big jelly lover at the same time that I publish a jelly recipe. The truth is that sometimes I do review my likes and dislikes. Whether I shouldn’t give an item a go again. And in this spirit I decided to make this recipe. It looked terribly summery and if anything, it is  appealing to the eye which is one of the first steps in having a pleasurable eating experience. Plus I would be using only fresh fruit and juice, none of that boxed stuff that one gets at the supermarket. My kitchen was full of berries which I had got at the local PYO – redcurrants, blackcurrants, strawberries, raspberries, and also some blueberries that I had been given. The only thing that stopped at my tracks was the mention of ‘perry’ in the recipe.

Perry…it made me scratch my head. I found out that Perry is a fermented pear drink – the pear equivalent of cider. It sems to have been very popular in Britain, mainly in the areas of Gloucestershire, Herefordshire and Worcestershire. Plus  Wales as well.  I read that Perry is having a revival so it seemed a good idea to use it after all. A seasonal and local jelly recipe. This recipe was in the Greatest British Menu and it was served with elderflower ice cream. I did not go that far. I stuck only to the jelly.

Ingredients:

  • 500ml Perry
  • 75g sugar
  • 4 sheets of leaf gelatine
  • 125g mixed berries

Preparation:

Put 100ml Perry in a saucepan and boil it. As soon as it boils add the sugar and mix until the sugar dissolves completely. Whilst the Perry is boiling put the gelatine leaves in a small bowl with cold water – enough to cover the sheets

Remove the Perry from the heat once the sugar is all dissolved and set aside. Squeeze the water out of the gelatine leaves and transfer them to the pan with the Perry, mixing until the sheets are dissolved. Add the rest of the Perry and let it cool.

In a separate bowl arrange the berries of your choice – you can divide the berries into 4 little containers of 125 ml each. Once the jelly mixture is cool, divide the mixture amongst the containers and put them in the fridge to set for one hour. After that time pour the rest of the jelly on the containers and let it set completely. This technique is to keep the jellies from floating to the top. Serve it as a refreshing dessert.

gooseberry cake

I don’t know when it happened exactly. That precise moment when it all changed. All I know is that this year I have fallen in love with gooseberries. The green variety, the translucent one, with its beautiful skin and quite unique shape. I have read about the read variety, the dessert type so they say, but I am yet to see it. I have been asking around so that next year I can try it. It was probably a process that started at my local PYO centre – Garsons in Easher. For years I have not cared the least about them. Well, for a very long time I did not even know that they existed – we don’t have them at home, and in the circles that I lived nobody talked about them.so they were invisible to me.  I only knew of the expression ‘to feel like a gooseberry’.  However, last year or the year before – I can’t be very exact, I bought some frozen gooseberries and made some lovely muffins. They tasted so lovely that I then decided to pick them up when in season the following year to bake the same muffins again.
I watched the PYO calendar with great attention this year and once I saw gooseberries available for picking I set a Sunday morning aside just to do that. I even managed to persuade a friend to come with me. I made the muffins again, and then decided that I should try a new recipe.  Going through my books I came across one by Sophie Grigson which arranges recipes by season. It had this recipe of gooseberry cake in which one needs to add stewed fruit. I had to look for another recipe in order to do the one stewed gooseberries. Google as always came to the rescue and after reading quite a few I ended up with a hybrid recipe. I did get a bit annoyed that I had a recipe within a recipe but in the end I just loved the stewed gooseberries so much that I forgot about my annoyance.
I chose to bake the cake in individual moulds just because I always prefer this method. Whichever size tin you decide to use it will not change the fact that you will end up with delicious cakes(cake). The final product is moist, with a unique perfume to it, and the flavour of the gooseberries is present but not sickening. It tastes really delicious, not too sweet. It also lasts for quite a bit if you keep it in a tin – around 5 days. This is if you resist the temptation to eat the cake within a few hours from it being ready. Yes, I did like it that much, but no, I didn’t eat it all in one go. My waistline cannot go any further.  

Now I am already looking forward to next year season and this time I will have a selection of new recipes to try. This relationship has to contiue being exciting.

Ingredients:

  • 280g self raising flour
  • 1 tsp baking powder
  • ½ tsp salt
  • 110g caster sugar
  • 110g Demerara sugar
  • 110g butter, melted and cooled
  • 2 eggs
  • 300ml stewed gooseberries
  • 1 tsp vanilla extract

Preparation:

Pre-heat the oven – 180C (160C fan assisted). Grease and line the base of a 23 cm cake tin or individual cake moulds.. Set aside.

Stew the gooseberries – use the recipe that your prefer. Remember that if you use a recipe of sweetened stwewed berries, the sugar in the recipe should be reduced otherwise you will end up with a cake far too sweet.

Mix the flour with the baking powder, salt and the two sugars – I like doing that with a fouet to air the mixture. Make a whole in the middle of the mixture and add melted butter, eggs, stewed gooseberries and the vanilla extract. Beat the mixture well. Once ready transfer it to the tin and sprinkle it with Demerara sugar. Bake for about 45 minutes if using the 23cm tin. Adjust the time in the oven if using individual tins – around 25/30 minutes.

Continue Reading »